
Month: October 2015
Time for family and second chances
 I am in a unique family. We have adult kids, and 2 young kids. My wife and I both have kids from previous marriages, and have 2 little ones ourselves. Well that being said, that’s not too unique, a lot of people have a blended family like that. What makes our family special is that my wife and I are in our mid 40’s, but we met when I was 13. We dated throughout school and life took us different ways.
We spent a lot of time being young talking about what the future was going to be like and boy did I think I had that figured out. I had BIG plans, but they didn’t include lots of money and fancy things, I wanted simple and basic. My wife has always been the listener type and being young she wasn’t sure of what she wanted like I was, so she worked on the plan her family wanted for her and go to college and mine was to go into the military.
Well my life never felt settled and I had many unsuccessful relationships both personal and professional. I always knew the life I was living wasn’t the life I was supposed to be living. Simple was never simple for me and I struggled.
I somehow managed to to find my way back to my get my second chance. I had no control in that, I never did. I followed the path I was supposed to follow. I had the kids I was supposed to have and my relationship with them isn’t always the best it should be, but I admit my faults there and do my best to do right by them. I hope they will always want to be a part of my life.
This past weekend my parents brought my oldest boy with them for a visit and I got to see something I should have taken a picture of. I was in that moment with them and I lost out on making a memory in a picture. I got to see my oldest boy, who struggled with our relationship over the years, hold the hand of his 2 year old brother and help him walk with us. He may not see or feel what I did in that moment, but I will be forever grateful he accepted his little bother as a part of our family. 
I have a chance to continue going forward and have my whole family be a part of that. I am blessed, but not everyone in my family wants to live the life of being self reliant. Taking the time to mend fences in your personal life is as important as the work in your day to day life. Remember to take that time and share those moments, because sometimes life takes the people you need in your life on a different path. My wife has been the example I try to follow, her help and understanding has made my journey back to the beginning very worth it.
Thanks for following me on my journey to being self reliant, If you like the blog, please consider liking, commenting and sharing it with someone. Take care, Eric, PSR
Food Prep: Canning
Canning is a great way to put away food for long term storage, and start up is pretty cheap if you bargain shop, or use places like Goodwill, Salvation Army or other thrift stores. Flea markets are great places to get canning supplies and cheap produce.
DISCLAIMER: I AM NOT A CANNING EXPERT I learned canning from YouTube and using references like http://nchfp.uga.edu/how/can_home.html. I strongly recommend doing your own research or learning from someone you might know to help.
We are fortunate to have a local orchard , its about 5 miles from us, and we got a great deal this year on our apples. Our orchard sells multiple types of locally grown apples, vegetables, and fresh honey. We try and shop here as much as we can, not because it is always the cheapest, but because its local and we support our community. Food prices are increasing everywhere, people have to choose between healthy and cheap, but sometimes you can get both. Our orchard offers “Utility” apples at a deep discount. Utility apples are like a scratch and dent sale, the produce has bruises and blemishes, they are ugly fruit. Since we planned to can and freeze them, being ugly was not a concern for us. We saved 50% on quality apples! 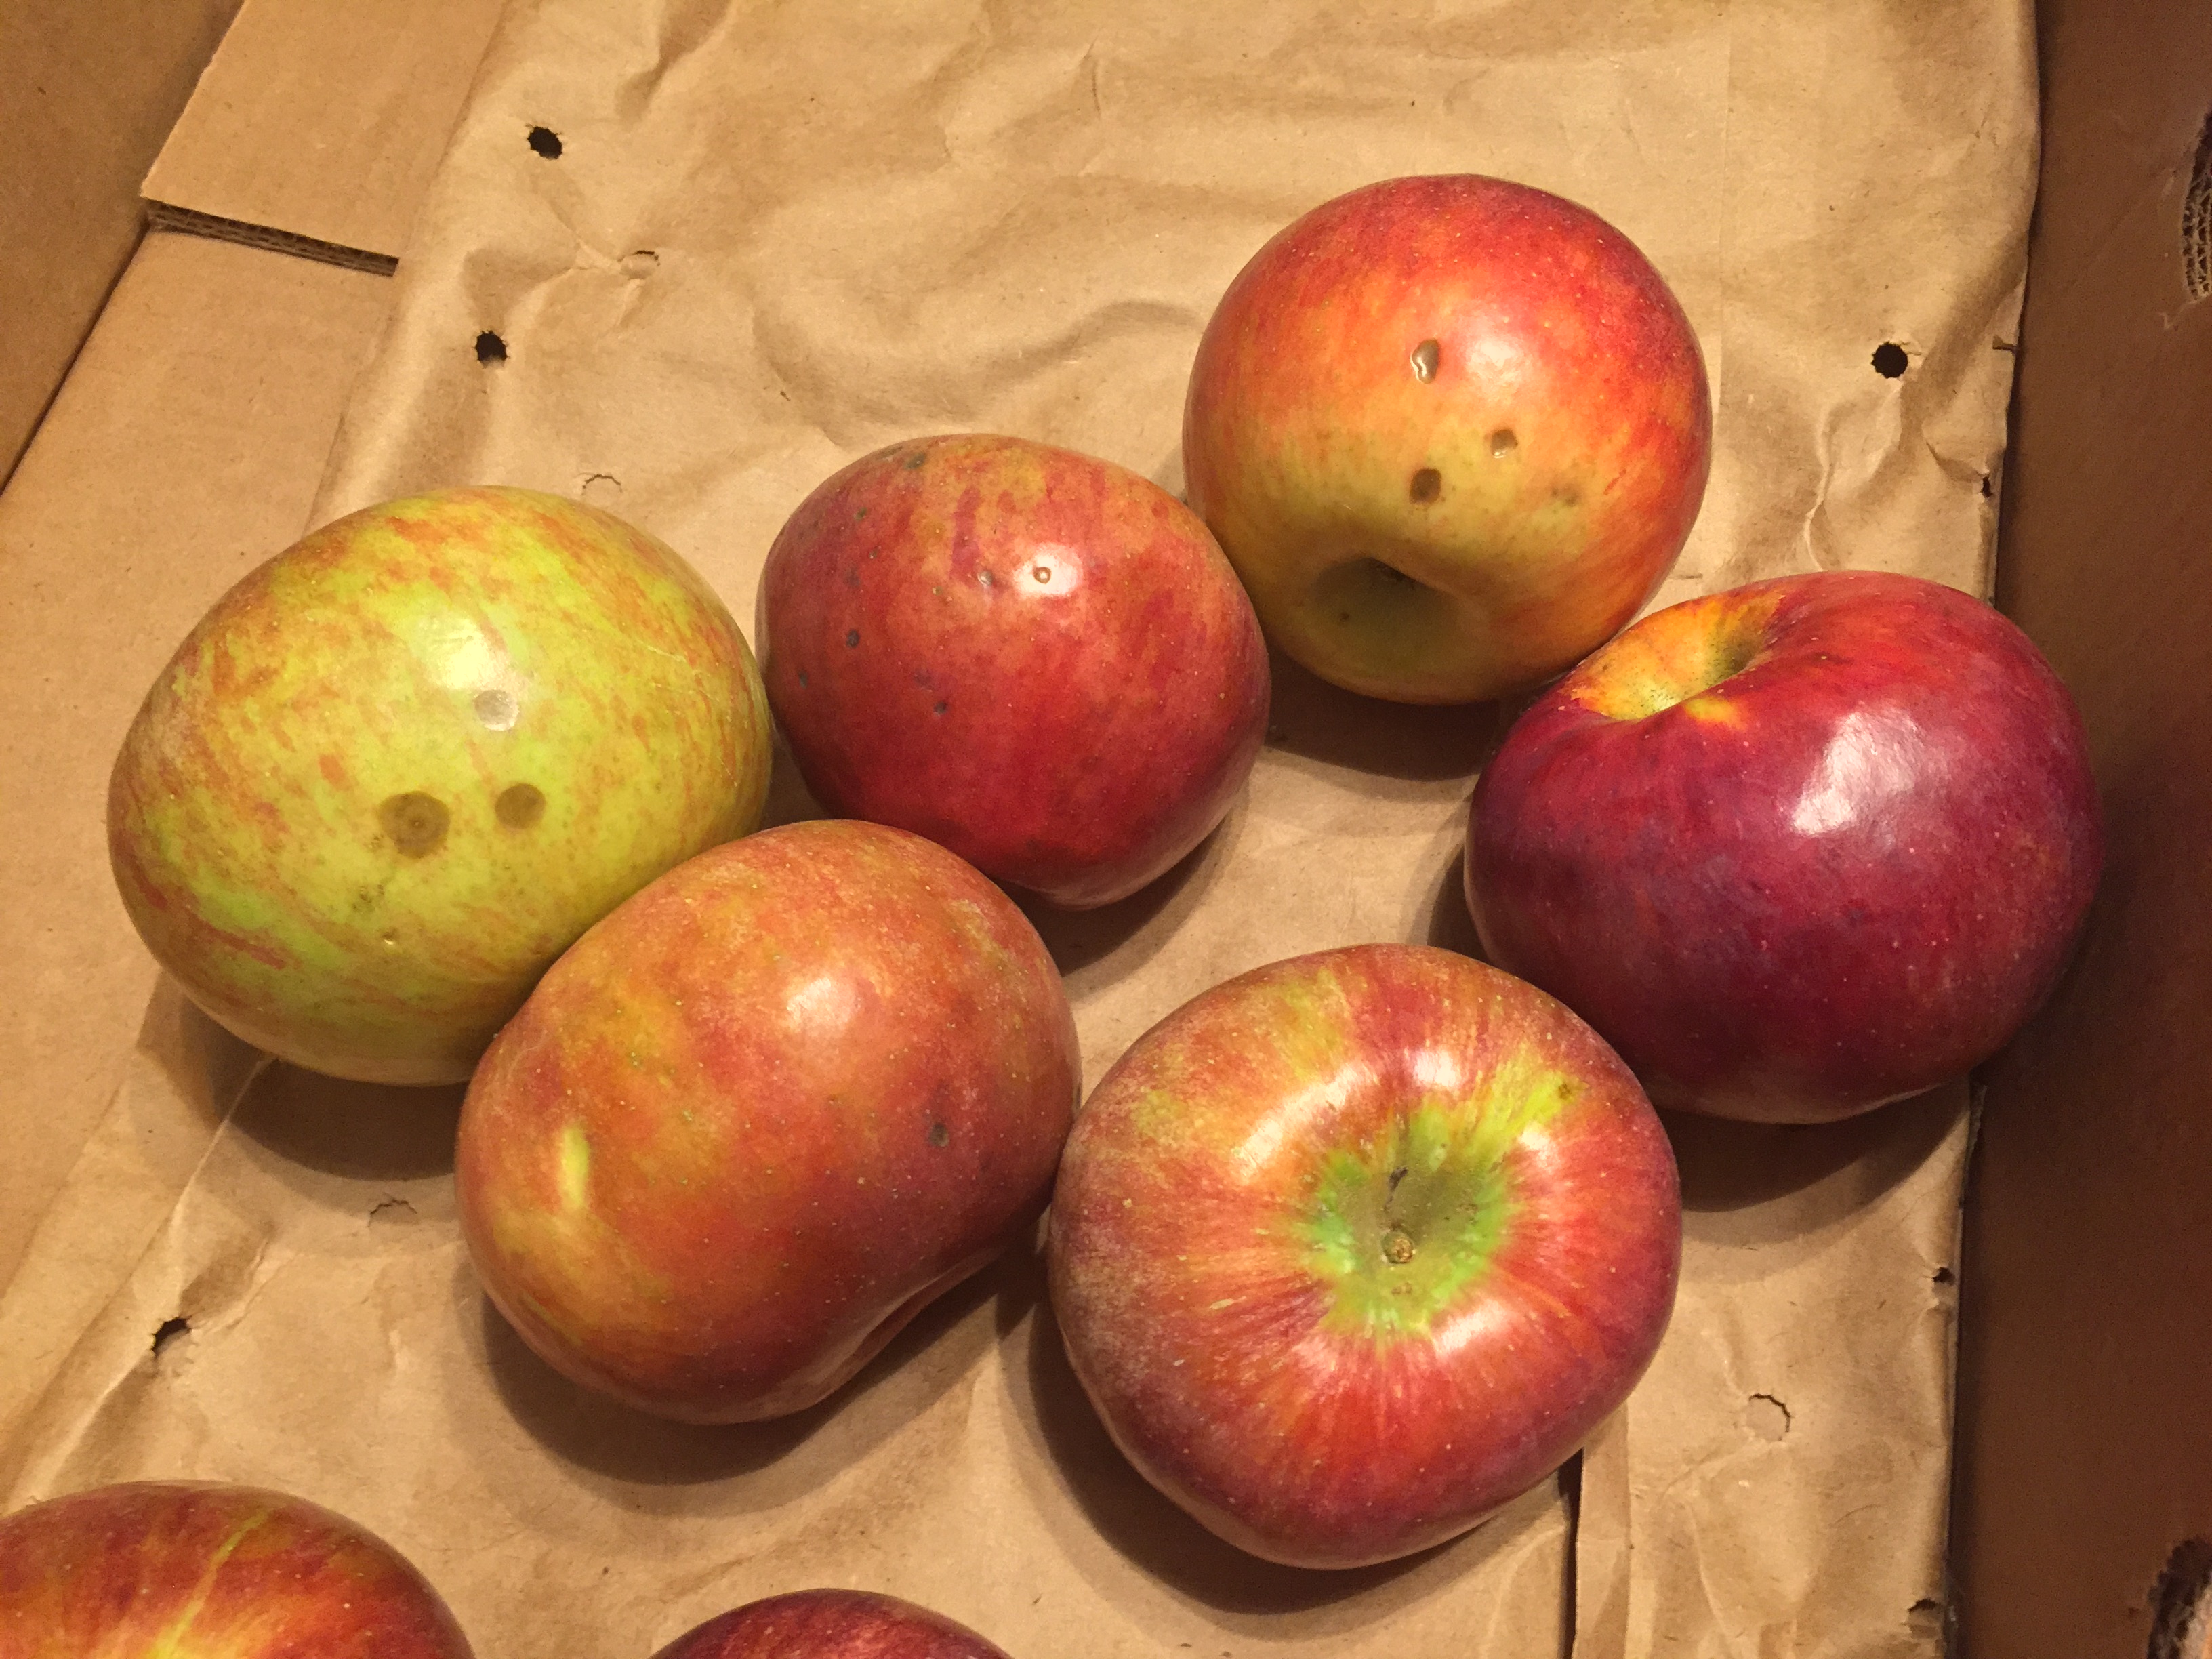
Processing apples is time consuming even when you got the fancy little peelers and corers like we do. Prepping jars, lids, rings, and simple syrup, it takes the better part of the afternoon. I love to do it, that work is part of the reward. I know what is in this food I prepared for my family, not a collection of ingredients I can’t pronounce and crap that’s just not good for you. There is also the time I spent letting my boys help and the time my wife and I spent together, it all is worth it. 
When it was all said and done, we had canned 12 quarts of apples, made about 4 quarts of apple sauce, made a 9×13 pan of apple crisp and I held back a dozen or so of apples to bake later. Total cost for our bushel was $ 20.00!! I promise you, ugly apples made a great tasting apple crisp.
Learning how to preserve food is a great way to be self reliant and knowing what you are consuming. I hope you all take the time to learn a bit more about canning or other ways of keeping healthy food, cheap for you and your family. Thanks for coming back and reading my blog, if you liked it, please consider leaving a comment, clicking the like button and share it with someone who also might enjoy it.
Take Care, Eric,PSR
EDC: Every Day Carry: Fire
 The ability to make fire is a high priority for anyone who is maybe lost or displaced from our comfort zone. Fire serves many purposes, heat, cooking, protection, light source, and the ability to process water. Fire is a morale booster as well bringing a bit a comfort to a bad situation or just that calming effect it has when the day is over.
Making fire and maintaining a fuel source are skills everyone should practice as much as possible. Sometimes even when conditions are favorable for fire, you can easily lose it. So when you determine that you are in need of a fire you should focus on a few things first.
Ignition source: The more ways to start your fire the better. Small disposable lighters are cheap and easy to pack. Matches are cheap and easy to pack, but unless they are in a waterproof container or are rated waterproof you might not want to consider this option. Ferrous rods are a good option for more advanced fire builders as well as flint and steel.
Tinder/starter: Lint can be a free fire starter. Packing away a small amount of lint can take very little space and not much is needed to catch a flame or spark. There are a lot of products available for fire starting, I find most if not all of them a waste of space and money. Making char cloth is by far the cheapest and easiest way to make fire starter. I plan to make a blog entry on how to make it and use it. If you are new to fire making, hand sanitizer and cotton balls is a great way to learn and stores easily in a zip lock bag.
Having multiple ways to make fire is the best option when making your EDC, but knowing how to use it effectively when you need to is just as important. I will cover fire building and making char cloth in my next entry. Thanks for following my blog, if you liked this entry. please consider liking and leaving a comment. Take Care, Eric PSR
EDC: Every Day Carry Part 3: Water Containment and Purification
 There are a lot of things you can do without when you are building your EDC. You can make do with less than you would want to because of ease and convenience, but water is not one of them. Being able to secure viable water is essential when using your EDC would be necessary.
The idea behind the bag is preparedness. This bag should always be kept with you and your family when you go from point “A” to point “B”. Since people may use a few different transportation methods, the bag will have more or less gear in their bag. I primarily use my bag traveling in our minivan, but I will still have to wear it if I become displaced from the vehicle. So with this in mind, and common knowledge of water weight, carrying water more than 2 liters would be excessive weight that would replace essential gear. Water filtration is very important as well as a container to hold and process it.
A rule of thumb for me when building gear for outdoor use is to limit plastic. There are many new products on the market that use plastic in one form or another, and some of this gear is good. Maintaining plastic in the field is a challenge since fire and extreme temperature can damage or destroy most plastics. Plastics also leech chemicals no matter how they refine them for safety, heat and cold will not help the integrity or sanitation. I am going to recommend stainless steel bottles for containment. Steel is durable and you can boil water in a fire to help with destroying bacteria and pathogens in untreated water. I have a product that I would like to recommend, but I haven’t tested it yet, so I will do a review on it after a testing trial. I will recommend a simple and cost-effective $20 product, LifeStraw.
So a great start to our water part of our EDC is pretty simple, a stainless steel drinking bottle and a simple cost-effective filter, easy to pack and maintain. Thanks for sticking with our EDC blog, if you enjoyed it please considering liking my post and leaving a comment. Take Care, Eric PSR
Blog Update
More EDC coming soon!! Taking time to redo and resupply gear, thanks for the patience and sticking with it.
Take Care, Eric PSR
EDC: Every Day Carry Bag Part 2: Cutting Tools
 Cutting tools are a very important topic of your EDC. This section isn’t as easy as just throwing some random knife in a pack and saying “DONE!” I want to stress again, everything you choose to put in your EDC should be things you have either used before, or at the very least seen others use, either on YouTube or in person. Having to open up your EDC out of necessity will be in a high stress moment so trying to learn how gear works during this time of stress will just add more stress and possible injury. Please take the time to research and review your equipment.
Primary Knife: My primary knife is a Mora. I have used this knife as my primary for over 6 years and am extremely happy with it. My Mora is the knife with the red handle pictured in this blog. I wear it in a neck holster when I use it in the field. This knife is small compared to many people’s primary, but this is done on purpose. Using a smaller knife makes the user more aware of trying to do a job that’s not suited for it. Same goes for large knives, but yet I see many people trying to use large knives for small tasks and these practices put you at risk of injury. I am a fan of finger guards on fixed blade knives, this is why I chose this Mora. There have been many new models added since I bought mine so if you see one that may suit you better, I don’t think you can go wrong with it on quality and price.
Working/Fighting/Hunting Knife: Ok, I am biased here but it is pretty hard to find issue with a KaBar. This knife is pretty much bullet proof, and its a work horse. I have owned and used a KaBar since I was a teen, while serving in the Marine Corps, and its also in the picture above. I wear this knife on my belt and it handles any task that I wouldn’t want to ask of my Mora. This knife intimidates people. During WWII in the Pacific Island Campaigns, this knife earned its intimidating quality. It sparks emotions with many that survived that time and I am proud to include it in my EDC.
Multi-tool: Leatherman Wave, is a very popular tool. I must admit, it was a gift. I struggle spending this much money on a tool I wont use as much as my other tools here. I am very happy that it was gifted to me, and I would buy another if I had to replace this one. I keep this tool in my pack and haven’t found a need yet to add it to my belt or in a pocket yet. It is also in the picture above.
Hand Ax: CRTK Woods Chogan, a must have in the Pennsylvania backwoods. I have had this ax for one camping season and I am very pleased with it so far. I have processed large wood to kindling, and the hammer end worked well repairing a small set of steps. This design also lends to being a self defense weapon if the need arose. Having the ability to build a shelter and maintain fire makes the hand ax a must have in any EDC. My ax is also pictured above.
So here are four cutting tools that are a priority for a EDC, but any one of these tools alone would be able to help you out of a bad situation and get you a better one. Thanks for reading part 2 of my EDC blog, if you liked what you learned please consider giving me a like and leave a comment below. Part 3 coming soon. Take care, Eric PSR
Gestures
Have you ever done something as a small gesture for someone and had them seem overwhelmed by it? I have wondered why some people react so intensely with the smallest of gestures. In my line of work…
Source: Gestures
EDC: Every Day Carry Part One: The Bag
Go Bag, Get Home Bag, Bug Out Bag, and Survival Bag. Whatever you choose to call them, they are pretty much the same thing. So from this point, I will call ours a EDC. I am going to break down building a bag into parts so you don’t have dig through posts to get the information you are looking for when you start your bag. Let’s get this point out of the way… there is no perfect way to build a EDC!! This post is not intended to make “Cookie Cutter” bags. I want to stress that YOUR bag will suit the unique mission you will expect it to perform for you. I will do my best to break down the pros and cons for the bag I will build for this post and it will be generic to suit most situations.
The Bag
Starting out, any bag will work, I will cover types of bags.
- Back Pack: This will probably be the most popular still of EDC. It offers a hands free option to carry gear with the easiest way to transport weight. I always look for a back pack for my EDC. Starting out, clearance packs like book bags will be a good choice.
- Duffle Bag: This bag will probably hold the most gear for its size offering convenience when looking for gear once packed. Most duffle style packs have hand and arm strap options for carrying and would travel well in a vehicle. I don’t think these bags would travel on foot very well due to the loose way they hang while using the arm strap, or not having your hands free if you hand carry them.
- Fanny Pack: I have yet to see a Fanny Pack large enough to carry enough gear to be a option of a EDC, but it can be used as a companion option with another pack option. I will not use this as a option in my build.
Once you pick the bag type you feel you will be most comfortable using we need to next look at the critical parts of the bag to make it functional. This will be a bit of a back in forth. Starting out or looking for a low cost option, making any bag work is better than not having one, but I want to focus a bit on where I see common areas of bag failure. Straps, they probably are the most important part of bag construction because that have to take the most abuse. So thick construction with good stitching is really important here. Padding is important for comfort, but thats it. Pack bottom, also really important to be thick and well stitched. External pockets are convenient but not recommended. They can be easily ripped off and get hung up on tight areas, this can cause loss of gear, destroying the whole pack, or causing a injury to yourself or others.
Some things to consider when looking for your bag is material. The most common bags today are nylon. There are many types of bags to pick from in this material, its light and good ones are durable, but my material pick is canvas. Canvas is harder to find, and more expensive when you find it. Canvas wears better than nylon, can be waterproofed easily, and will not melt if it comes in close contact with heat. Leather is also a option if you have it, but I will not cover this since I want to be practical and frugal. Zippers are another thing I would stay away from since they are difficult to repair, buckles, straps, buttons and drawstrings are all easier to replace or repair and should be considered over zippers and plastic closures.
So where you start and where you end up will probably have many changes as you use it and ideas evolve, thanks for being a part of my EDC bag part one! If you like this post please consider giving me a like and leave me a comment below.
Take care, Eric, PSR
Cold weather checklist
 The temperature is starting to get lower and lower now that October is here, especially at night. Did you start a cold weather checklist yet? Do you do one? My wife is REALLY into lists, so I am going to appeal to her and people like her with a small cold weather checklist that are things I focus on when fall and winter are on its way.
- Furnace check: You may have already turned on your furnace already and know that its working, or maybe its not? Making this a end of summer check will help you in multiple ways. Its better to find you need service before its already cold out and need it, and if you do need service chances are the HVAC guys aren’t getting calls from everyone else that just found out its cold and there isn’t any heat. Same goes for your fireplace or wood burner.
- Car service: Antifreeze, tire pressure, all fluids and battery check. Having all these things looked at now will save you problems later that may leave you cold and stranded later. I add fleece throws in our van and make sure the portable battery jumper has a full charge and is working. Keeping a case or bottled water is a good item to have, or at least a few bottles.
- Back up heaters: Does your home have gas, electric, or maybe wood type heat? What back up you have in case your service is interrupted? We have a kerosene back up so this is the time I make sure the wick is still good and replace it if needed. Our backup will heat our whole home, we have had to use it before.
Hopefully this short list will get you started and get your thinking about what you need to do to get you and your family ready for colder temperatures. Weather here in Pennsylvania can be unpredictable and harsh at times. Be proactive not reactive. Thanks for coming back and take care.
Eric PSR
